 |
 |
 |
 |
 |
 |
 |
 |
 |
 |
|
| The following Japanese famous hobby stores are written in English and can
ship to oversea! |
  |
|
 |
|
 |
|
 |
|
|
|
| FUJIMI 1/24 scale Enthusiast model Series |
| How to build Lamborghini Countach LP400 |
|
 STEP 2 : Remodel of Pop-up Headlights & Chassis STEP 2 : Remodel of Pop-up Headlights & Chassis
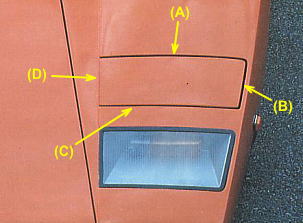
About the gap space of the four sides of headlight lid, Those ratios are
(A)=(B)=(C). Furthermore, only (D) does not have gap space at all. But
the plastic model kit is not copying this mechanism precisely.
I couldn't understand why pop-up headlights of Countach have such a mechanism.
Therefore, I tried to check enthusiastically about it.
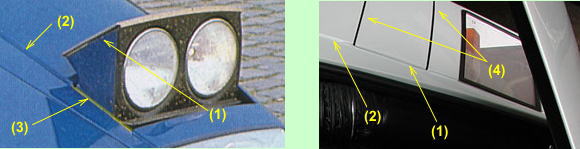
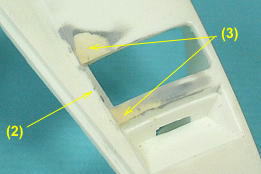
 The mechanism of real pop-up headlights The mechanism of real pop-up headlights
- (1). The stopper that is protruding toward bonnet hatch side for the close
is attached to the headlight lid.
- (2). There is a small difference in level on line. It is the same as the
thickness of the stopper (1), and those become the same surface when the
headlights closed.
- (3). This yellow part is inside a little than the line of (2). When headlights
close, (1) cover on (3). Therefore, The gap spacing for (1) almost doesn't
show.
- (4) is level with the bonnet. Therefore, those have equal gap spacing.
I understood this mechanism. The headlight of the model is not reproducing
this mechanism. The gap of all sides is equality. The mechanism is so complicated
that be not reproduced to 1/24 scale model. It may be difficult work to
reproduce this mechanism. But I would try to this remodel for my client.
Remodel of Bonnet
 I added part of (2) to the bonnet parts with 0.5 mm plastic board. The
width of holes of headlights unit became a little narrow with such a reason. I added part of (2) to the bonnet parts with 0.5 mm plastic board. The
width of holes of headlights unit became a little narrow with such a reason.
Difference in level of (3) is not sufficient. Therefore I remolded the
form with putty.
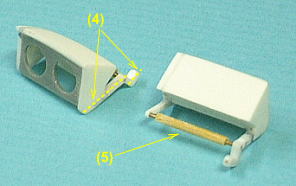
Remodel of pop-up headlight parts
(1). I cut the yellow place to make the headlight parts to that holes same
width.
(2). I will make the new headlight cover. Therefore I shaved top of the
headlight parts.
(3). The opening stopper is so small that I cut it and will remake more
big.
(4). The stay that was reinforced by inserting brass lines.
(5). The shaft was changed to brass tube and line.
I glued 2 parts in this stepping. Therefore the headlight lenses will be
attached after painting.
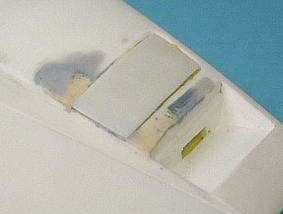
Adjustment of gap spacing between bonnet and pop-up headlight lid
I did the test assembly of headlight and bonnet parts, (not glued) and
adjusted the opening and closing mechanism of it.
Next, I glued the headlight lid that was made from 0.1mm plastic board
on headlight parts, and adjusted the gap spacing of both parts.
It will bring a little error by the paint layer. Therefore I gave the margin
to it.
(1). New head light lid from 0.1mm Plastic board.
(2). The stopper that is protruding toward bonnet hatch side for close.
(3). Pop-up headlight that was narrowed width and was shaved lid part.
(4). New opening stopper that was remade bigger than before one.
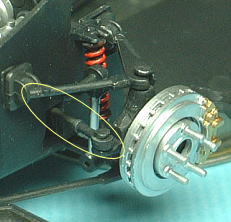
Build of Front Suspensions
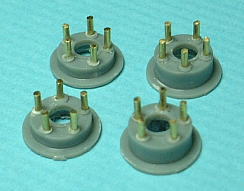
The mounting parts for wheels have 5 bolts. Wheels are fixed to the mounting parts with those. However, those are a meager durability that have broken if those were touched. I exchanged them to 0.8 mm brass line. I expanded the aperture of the holes of wheel. because the diameter of bolts were increased.
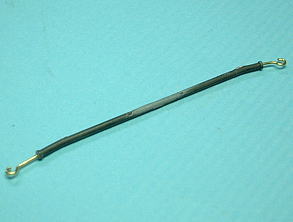
Front suspension of this kit is set up "Toe-in" excessively.
I remodeled the tie-rod more short and reinforced it with brass line.
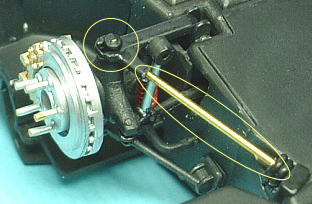
I exchanged the lower-arms of right and left to brass line because it broke
during this work. The parts of this kit are so fragile that those have
broken quickly during work.
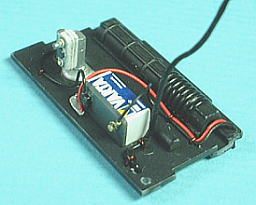
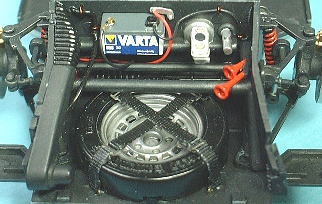
Remodel of Bonnet room
I added several electricity wiring to this part. As for the terminals of
real battery, those form are different with plus and minus. I changed each
form. About a horn, I made the hole of rappers. Furthermore, I added restraint
bands to spare tire.
Build of Muffler
I made muffler cutters from chrome plated brass tube. The burnt spots of
catalyst device is sprayed with smoke black, clear yellow and clear blue.
Build of Engine room
 All sides of the engine room are divided to 4 parts. I glued them certainly with super glue. The pipe frame parts have many parting lines and big gap between attaching face and chassis. I modified these points. All sides of the engine room are divided to 4 parts. I glued them certainly with super glue. The pipe frame parts have many parting lines and big gap between attaching face and chassis. I modified these points.
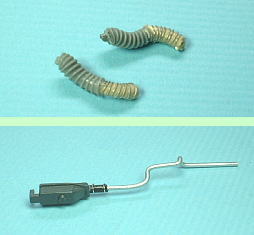 The air duct pipes are too short. I extended there with epoxy putty, and
molded the cornice pattern by winding wire to around there.
The air duct pipes are too short. I extended there with epoxy putty, and
molded the cornice pattern by winding wire to around there.
The pipe that is growing from reserve tank is omitted. I added and bent
it to complicated form so as not to interfere to other radiator pipes.
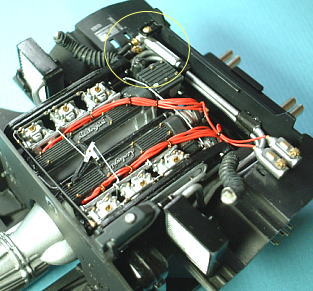
I loaded engine and periphery devices on chassis. Radiator pipes were instructed
to black painting in the instruction. But I painted silver to them in consideration
of beauty. The color existed in real car.
I revised attaching position of the devices that is marked in yellow circle because the position of kit was a mistake. and I wired some cords to engine room.
Build of Rear Suspension

Lower-arms of rear suspension are very narrow and fragile. I reinforced them and other narrow parts by inserting brass lines. Rear suspension of this kit is set up high-waist to share with Type LP500S(Walter Wolf Special) that is equipped with over-fender. I shortened the length of rear dumpers. In this way, the height was adjusted to proper value.
|
|