 |
 |
 |
 |
 |
 |
 |
 |
 |
 |
|
| The following Japanese famous hobby stores are written in English and can
ship to oversea! |
 |
|
  |
|
 |
|
 |
|
|
|
TAMIYA 1/12 SCALE
| How to build McLaren MP4/6 HONDA |
|
 Introduction Introduction
 The year when I completed this kit is 1998 years. But, the year when I
bought this kit is 1994 years. The year when I completed this kit is 1998 years. But, the year when I
bought this kit is 1994 years.
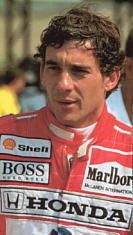
It was the day when Ayrton Senna who was the great F-1driver died the accident in San Marino GP on that day.
What a Mischief of fate!
I felt wonder to this kit that I bought in the accidental same day.
Ayrton Senna more drove F-1car powered by HONDA than other F-1 drivers,
he won the more victory than other F-1 drivers by F-1car powered by HONDA.
And he loved Japan of the homeland of Honda as "the second hometown".
Ayrton Senna was real driver of HONDA.
I am thankful to Ayrton Senna which loved Japan as a Japanese.
And I want to praise the service of him who made Japan generalize F-1 culture.
I thought that a satisfactory thing was not made by me by the technical
power of mine of those days. Therefore, it was that I began to make the
kit from 1998 which are four years after that.
It took nine months to make. Instead, I think that it became the work which goes satisfactorily.
Thank you, Ayrton Senna! You were the greatest F-1 driver. Your achievement
will remain into our heart forever.
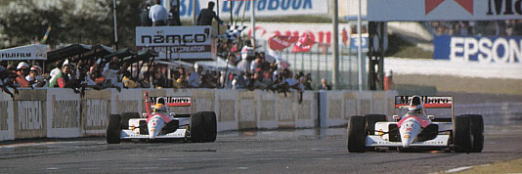
In 1991 Japan Grand Prix/The moving scene of 1-2 finish by G.BERUGA and
A.SENNA.
 STEP 1 STEP 1
Making point
Since it was possible to have stuffed the remarkable amount of information
into a model when it became this size, I did thorough reconstruction of
the following point.
| Use of a Multiple material |
Real F-1 is made of various materials, such as carbon resin, aluminum,
and rubber. Therefore, I decided to reproduce a model for the nearest possible
material. |
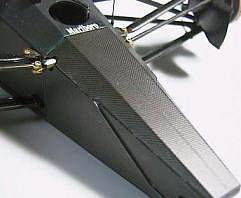
| Reappearance of a carbon pattern |
Carbon Decal is attached as much as possible on the parts of carbon. |
| Reappearance of thin edge |
Cowl, chassis, wing etc...those were made edge thin |
| Perfect reappearance of code and pipe |
I reproduced it by having searched wiring as much as possible.
Since, as for the kit, the connector of a code and the tap of a pipe were
omitted, I built it newly. |
Making of Up Right
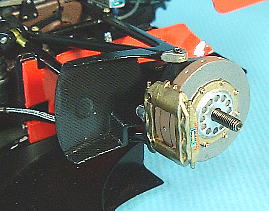 Disk brake consists of right-and-left division parts. I fill the crevice
between the junction part with putty, and remade the hole of the benchrate
by micro drill. Disk brake consists of right-and-left division parts. I fill the crevice
between the junction part with putty, and remade the hole of the benchrate
by micro drill.
And after it shaved the air duct thinly and it attached carbon decal, it
coated on semi-gloss clear color.
Furthermore, the brake hose was wired from the brake caliber.
■Making of carbon composite monocoque
The color of monocoque is having blue blended for a while black, in order
to direct the image made by McLaren of those days.
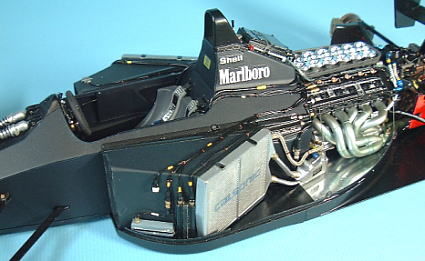 |
| Although monocoque was black in fact, it was made somewhat blue. |
As for the tip portion, the carbon pattern is molded. I attached carbon
Decal be careful in the direction of a pattern.
Since the kill switch around a fuel tank was omitted, it was added wuth
photoetch.
 |
|
 |
| The small red lever beside an antenna is a kill switch. |
|
The tip portion of the monocoque on which carbon Decal is stuck |
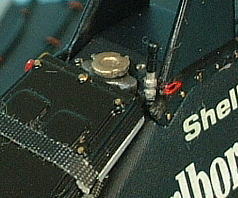
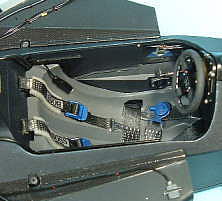
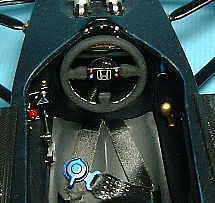
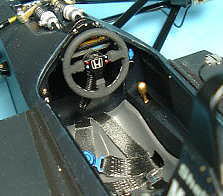
Making of cockpit
stabilizer adjustment lever of front suspension of Steering lower left
remade the rod from piano wire.
The seat belt is reproducing the textures of alumite by taking plating
of a metallic-ornaments part and painting metallic blue color. Furthermore,
the cable for communication is added beside a sheet.
For expression of the buckskin of a steering, the paint which mixed flour
with flat black is painted, and a stitch is written in it and the spiral
code made by the nichrome line is attached.
 |
|
 |
| The cable of a left shoulder portion is a communication cable. |
|
Front of Center console |
 |
|
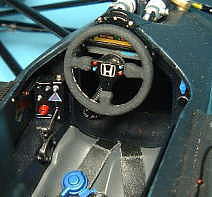 |
| Cockpit right-hand side. A shift lever is visible. |
|
Cockpit left-hand side. A switch box is visible. |
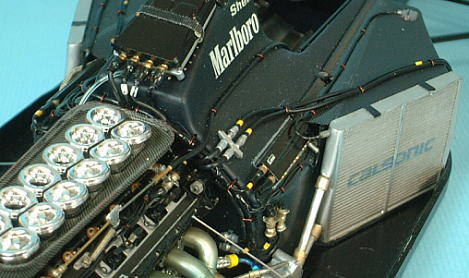
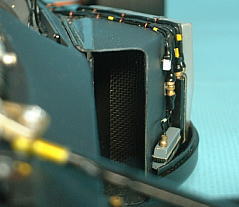
Making of side air-intake duct
It is the greatest reconstruction part of this time. Full reappearance
of most cables has been carried out. The cable is exchanged for MODELER'S
production from kit accessories.
The connection portions of the connector of an electric device and a code are reproduced.
First, the heat contraction tube currently sold at the electric repair
store is put on the junction part.
Next, a heat contraction tube is heated by writer. Then, it is united with
the form of junction part and is contracted. In this way, a connector is
completed.
The oil tube expressed oil by inhaling clear yellow to inside.
I made the mesh for gravel penetration prevention in the air-intake duct.
As for 1/12 scale, it is good that such fine portions can also be made.
 |
|
 |
| Although one more twin mesh for gravel penetration prevention is not in
this photograph, it is in the back. |
|
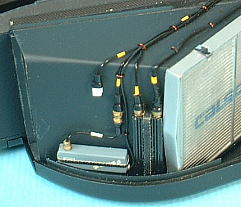
A connector is made from a heat contraction tube. |
 |
|
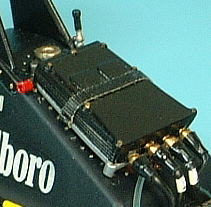 |
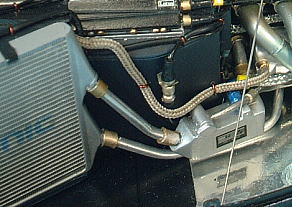
| Cooling piping was made from aluminum pipe. |
|
The band which stops an electric device used the seat belt set of MODELER`S. |
The attached pipe becomes a terrible number just like nerve tissue. They are bundled at the monocoque back.
It fixes by binding them with the reverse-side side of monocoque using
a metal wire.
|
|