 |
 |
 |
 |
 |
 |
 |
 |
 |
 |
|
| The following Japanese famous hobby stores are written in English and can
ship to oversea! |
 |
|
  |
|
 |
|
 |
|
|
|
| Detailing 1/700 scale aircraft with the photoetch: Part 1 |
|

|
 Let's try to use photoetch Let's try to use photoetch
Many details of the WL accessories aircraft model are omitted because 1/700
reduced scale is so small.
|
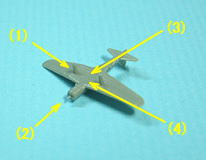  Omission parts Omission parts
In the case of B5N2(KATE)
(1) Landing gears
(2) Propeller
(3) Optional armament
(4) Wheel storage space
The omission part is almost gathered on lower part. However, If those set
up it on warship, those are the parts which are difficult to be seen. If
those parts are attached, the model will have excellent details. The most
basic way is photoetch. |
| Detailing 1/700 scale aircraft with the photoetch: Part 2 |
|
I am going to explain the process to an example with B5N2(Kate) of CV Kaga squadron. This work is used airbrush and photoetch from fine molds. The example model is the clear type of limitation model within Japan. Please begin to read this from process 4, in the case of normal type.
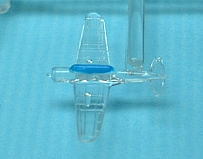 Process 1 Process 1
The clear canopy was coated by "Masking sol". ''Masking sol"
is liquid type mask material from GSI Creos. If the membrane is coated
thickly it will be easy to peel later. The brush that is belonged to bottle
cap is difficult to use. You had better use thin brush.
 Process 2 Process 2
If paint is not performed in process 2, the body is sprayed thinly with
the surface-primer to discover irregular face of wound or parting-line
which appears by injection modeling system. Surface-primer has the effect
that makes easy to discover irregular face.
 Process 3 Process 3
In the case the kit is normal type, here is start point and cutting the
landing gear pins. The body part was cut from runner. I restored the irregular
face of cut-line and parting line If you apply edge of art knife to the
irregular face of parting line vertically and scrubbing, you will be able
to shave it easily.
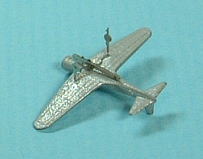 Process 4 Process 4
the landing gear and armament parts were attached the under the body. We
must treat it carefully because the prop is easy to break.
 Process 5 Process 5
The torpedo and bomb are flat, because it is photoetch. I modeled the three-dimensional
torpedo by putting B on it repeatedly. The liquid type putty that I used
this time was "Mr. SURFACER 500" from GSI Creos Co., Ltd. Next,
the second surface-primer paint was carried out.
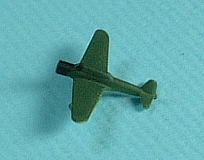 Process 6 Process 6
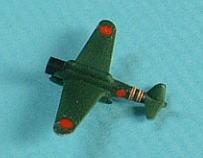
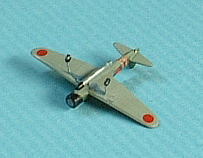
The body color was sprayed with airbrush. KATE was painted 2 tone camouflage-color
of light gray and deep green. when the color is painted, it have the rule
which paints bright color previously. Dark color will be looked through
bright color, if bright color is painted later. The black painting of engine
cowl was painted by brush.
 Process 7 Process 7
If red circle decal is attached on dark-green color, that color will become
muddy because the under ground color will be looked through red color.
I attached white circle decal under red one. I made the edge around brass-pipe
by filings, and mass-produced a white circles by stamping it on white decal
sheet.
 Process 8 Process 8
I attached red circle decals on white one that dried completely. Then a
vivid red rising-sun flag finished.
 Process 9 Process 9
The engine in cowl, landing gears, armament and wheel storage space are
painted after semi-gross clear coating to give metallic touch to those
parts.
 Process 10 Process 10
I peeled off "Masking sol" of the canopy and draw the canopy
frames by thin brush. If the color is the enamel or water acrylic color,
we can retry it after the paint was washed out with thinner even if it
fails, because those colors do not erode the lacquer color.
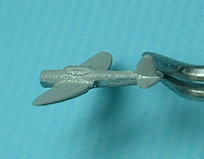
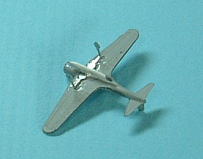
 Process 11 Process 11
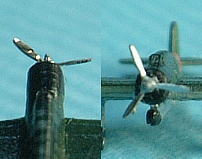
0.2mm brass line was driven in cowl of center, propeller was passed in
it. The blade is twisted by tweezers and the pitch corner was attached.
The direction where it is twisted is reverse turn of clock needle. The
angle had better attach exaggeratedly. As for the color of propeller, face
is silver and reverse side is flat-black.
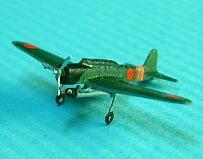 Completion! Completion!
Even 1/700 aircraft model changed like this. If you hope more precise model
, you should remodel next details. Antenna prop, Pitto pipe, Machine gun,
Dive brake, Dropping flap, Opened canopy etc. Let's try the limit of precision!
I made such a special type only 1. Please see it.
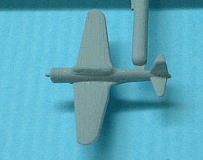
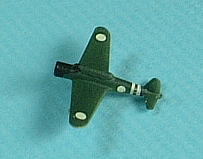
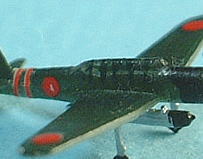
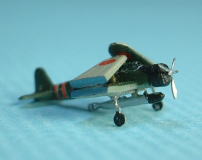 Fold wing style Fold wing style
This is fold wing style. The wing was cut once. The after, it was changed
the angle and pasted on the body. The point of this case is restore the
irregular face of section of wing. If that is not done, the model will
be seen unskillfully. the remodel is important to finish beautifully to
such a small part. Although it is hardly able to confirm in a left image,
I made restraint wire of the wing with 0.2mm brass line.
|
|