 |
 |
 |
 |
 |
 |
 |
 |
 |
 |
|
| The following Japanese famous hobby stores are written in English and can
ship to oversea! |
 |
|
  |
|
 |
|
 |
|
|
|
| How to attach photoetched handrails |
|
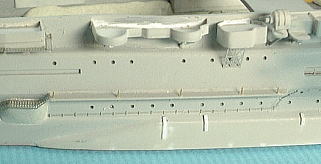
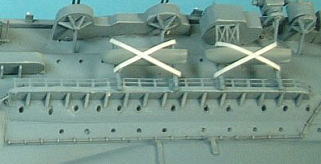
 The most popular method (Side attaching) The most popular method (Side attaching)
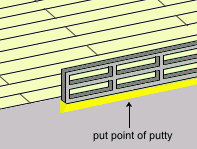 This is a method photoetch handrail is attached in the side of the hull.
handrail is glued to the hull. The difference in level between handrail
and hull (yellow part of a left image ) is buried by putty. If it is polished
the site with sandpaper, the difference in level will become flat. The
shortcomings of this method are that the durability is weak. We must pay
attention to handling. This is a method photoetch handrail is attached in the side of the hull.
handrail is glued to the hull. The difference in level between handrail
and hull (yellow part of a left image ) is buried by putty. If it is polished
the site with sandpaper, the difference in level will become flat. The
shortcomings of this method are that the durability is weak. We must pay
attention to handling.
|
|
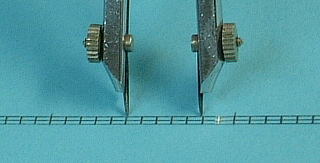
Method that uses the runner of handrail as stake (Top attaching)
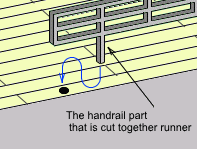 The handrail part is cut together even the runner. The runner is used as
a stake. It is plugged to the deck that was opened the holes and be glued.
The interval of the runner that becomes a stake is calculated and 0.3 mm
holes in the same intervals as it the edge of deck are opened. Runner is
plugged to the hole and be glued. This method is more stout than the above
one. But, it is fragile after all, because it is a thin metal plate. The handrail part is cut together even the runner. The runner is used as
a stake. It is plugged to the deck that was opened the holes and be glued.
The interval of the runner that becomes a stake is calculated and 0.3 mm
holes in the same intervals as it the edge of deck are opened. Runner is
plugged to the hole and be glued. This method is more stout than the above
one. But, it is fragile after all, because it is a thin metal plate. |
|
Method that inserts reinforcement material in the back of handrail
This is the method that I practiced. It is the method that uses a line as a reinforcement material The method is a characteristic to be more stout than the method that I introduced until now.
 The brass line is attached to the back of the prop of handrail so as not
to be conspicuous. I measured the interval. The brass line is attached to the back of the prop of handrail so as not
to be conspicuous. I measured the interval.
 I opened holes in the place that is attached the handrail and plugged 0.2mm
brass lines there. I opened holes in the place that is attached the handrail and plugged 0.2mm
brass lines there.
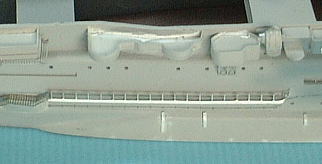 I overlaid the prop of handrail into a brass line and glued. I put putty
there, to delete the opening between handrail and adhesion part. The white
part of the left image is so. I overlaid the prop of handrail into a brass line and glued. I put putty
there, to delete the opening between handrail and adhesion part. The white
part of the left image is so.
 I restored it by grinding the surface with sandpaper and this work was
finished. I restored it by grinding the surface with sandpaper and this work was
finished.
 This is same image of upper one after painting. The difference in level
of root of the handrail and brass line of the back's hardly conspicuous. This is same image of upper one after painting. The difference in level
of root of the handrail and brass line of the back's hardly conspicuous.
|
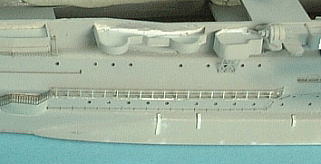
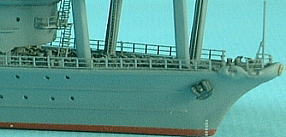
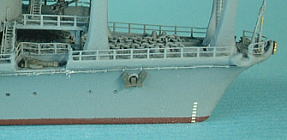
Comparison between modified handrail root and not one.
 |
|
 |
| Modified handrail root (Akagi) |
|
Not modified handrail root (Kaga) |
Like this example, The right image is better than left one.
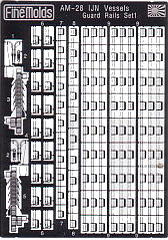
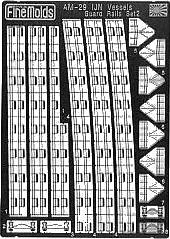
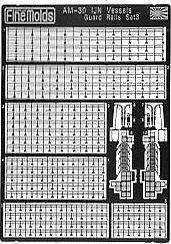
The good idea product of Fine molds
The photoetch handrails for IJN warships from "Fine molds" is
released three types of products, "IJN Vessels Guard Rails Set 1 Straight
Chain type (AM-28)","IJN Vessels Guard Rails Set 2 Curve Chain
type (AM-29)", and "IJN Vessels Guard Rails Set 3 Iron bar type
(AM-30)", now. Those photoetchs have the good idea which the existing
products do not have. It is a tab for sticking.
 |
|
 |
|
 |
AM-28
Straight Chain type |
|
AM-29
Curve Chain type |
|
AM-30
Iron bar type |
|
 English translation of the manual English translation of the manual
- Please attach this handrail using a tab for sticking or the extended bar
of fixation. It can be used properly as you need.
- Extended bar of fixation
- Tab for sticking
- When attaching by a tab for sticking,
- Please bend a tab for sticking and apply glue to a reverse-side.
- Cut.
- When holes are dug on the deck and handrail is fixed,
- Cut.
- Please dig 0.3mm holes ion the deck by pin vise and fix by super glue.
These are convenient products for the beginner and model builder weak of
photoetch!
|
|